
Replacing carriage belt on HP Designjet 500


Unlock Carriage:
The purpose of this Service Utility is to unlock the Carriage Assembly which is normally locked by the Service Station in order to cap the Printheads. Once unlocked, the Carriage Assembly can then be moved freely along the Printer by hand. Perform the Unlock Carriage utility as follows:

  • In the Service Utilities submenu, scroll to "Unlock Carriage" and press Enter.
  • Once the utility starts, the printer will begin to unlock the Carriage Assembly and the following message will be displayed on the front panel.
  • Once the Carriage is unlocked (Printheads have been uncapped) the following message will appear on the front panel: NOTE The Carriage will remain uncapped until another action (e.g. loading paper or replacing Printheads) is selected which returns the Printer to normal operation. Make sure you leave the Carriage in a locked position once the repair is completed.

Removal
1. Switch off the Printer after unlocking carriage.
2. Remove the Left Hand Cover
3. Remove the Right Hand Cover
4. Remove the Top Cover and Window -

5. Remove the Front Panel Assembly -

6. Remove the Service Station -

7. Remove the Fork Idler, Tensioner and

8. Remove the Encoder Strip -
9. Remove the Service Station Holder -

10. Manually move the carriage to the correct position to remove the Tubes Assembly from the Carriage.

11. Release the latch and lift up the Carriage cover.

12. Remove all the Printheads.

13. Loosen 1 T-8 screw that secures the Tubes to the Carriage.

14. Unclip the Tubes from the Carriage and lift up.

15. Move the Tubes Assembly clear from the Carriage Assembly.

16. Close the Carriage Cover. Unclip

17. Unclip the Carriage Cover (clip located on the left hand side of the Carriage - use a screwdriver if necessary).

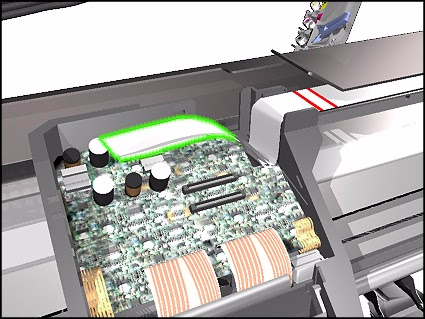
18. Remove the clip securing the Trailing Cable.

19. Disconnect the Trailing Cable from the Carriage Assembly. Remove

20. Slide the Trailing Cable out of the clip inside the Carriage Assembly and then lift up to free it from the Carriage.

21. Slide the carriage (including the Belt) to the right and out of the Printer.

22. The Belt can then be slipped off the Carriage Clips.


Installing the Carriage Assembly:
When connecting the Trailing Cable to the Carriage, make sure that you align the red lines on the Trailing Cable as shown in this drawing.

NOTE When installing the Belt, make sure that you insert it into the Carriage as shown in this drawing.

Comments

hi, how can i please replace the Starwheel Motor? thank you!

lumicon@gmx.de

Popular posts from this blog

How to fix error B200 on canon Printers

MAJ11/06/17 Error B200 means the printhead voltage or temperature is not normal. The Printhead could be defective.... but first, try these solutions below: Solution 1 : Disconnect the power cable from the printer. Wait 1 hour. Connect the power cable Solution 2 : Check and Clean Head contact pin condition of the carriage unit Check Cable connection especially the carriage FFC Solution 3 : Turn off the power Open the panel Turn on the power Wait for print carriage to start moving to the left. Let it go past half way Before print carriage reaches left hand side shut the cover. Leave the Printer turned on Solution 4 : Unplug the power cable. Open the printer Push the whole print head mechanic to the center While the printer still open, plug the power and turn it ON.  When the printhead still moving and is going to the very LEFT, close the cover.  Wait until its boot up.  Solution 4a: Take out all of the ink cartridges Lift up the gr

How to solve error code 006 with Canon Service Tool V3400

MAJ 25/08/17 The Service Tool V3400 allow to reset the counter of some Canon printers. For the error code 006 , try this : Solution 1: Check your cartridges: an empty cartridge can lead to error 006 Solution 2 : After you avec clicked on "Main", wait a few minutes.  If the error still here, restarts the Service Tool Solution 3 : Close the service tool Disconnect the USB cable from the printer After 10 seconds, plug back the cable to the printer On Windows, click next when appears "New device" Open the service tool

How to solve error B204 on Canon Maxify printers

The error B204 could happen after a cartridge replacement. First of all, when installing, remove the cartridges from the plastic package, but do not drill any plastic membranes, as this will cause this error when placing the cartridge. The error may also appear if you change a completely empty cartridge: when installing a full cartridge, the printer enters a cleaning cycle, but the printhead has not yet received ink from the newly inserted cartridge. Here are some tips to cancel this error B204:: Solution 1: Remove the cartridges Power the printer for 2 minutes Switch on the printer Install the cartrdiges Solution 2: Switch on the printer Unplug  the power cable Open the cover Move the print head carriage manually to the usual place where it goes for the cartridge change (If the printhead carriage is not movable, reconnect and then turn on the printer, then unplug it again when the head carriage is in the moving position). Change the cartridges. Close the fr